This is nothing less than as simple story about me building a trike.
Whit this telling I will try to give you some advises on the road to a
homebuilt bike. Do not just read this story, there is plenty on the internet.
In the end of this document, there are additional links to more homebuilders
with their hints and advice. Do look on them too. Even on those who have
built two-wheelers. Certain things in this document are applicable on two-wheelers
too, but because of the fact that I have built a three-wheeler it do goes
like this. You do not have to read about Ackermann to build a two-wheeler,
but you do have to read Bicycle
Steering Geometry and An Introduction to Bicycle Geometry and Handling..
Really boring but so important...
What should it look like?
There are two sorts of Trikes, Tadpole or Delta
Tadpole = 2 wheels in front 1 rear, delta = 1 wheel in front 2 rear.
Each of them has its own advantages and disadvantages. Have a look at different
bikes and try them out. Look on the internet, mailing lists, check out
the clubs. Join a club (recommended), and nag the members to boredom about
steering geometry, length, width, wheelsizes, gearing and the all so important
length of the cranks (you ought to get some answers before they get stupefied
). On some point you reach the conclusion " -This is how it's going to
look like".
Find someone who has already built the one you want to build and is
willing to share his drawings, or go and buy the drawings from a trike
manufacturer (could be expensive). The advantage you get by choosing something
somebody already has built is that it is already tested (hopefully). You
do get fewer errors.
Draw your own... Well? In that case you have to read a lot more than this
document.
Decide everything about your bike. Decide what equipment you would
like it to have before you start building it.
Even the smallest change can make it impossible to go on building if
the change is in the wrong place. Only to start over.
Bummer…
One thing you ought to consider. Where are you going to keep it? Living
on the second floor in a house with no elevator? Villa? You need to think
on the size, the width, length and weight. You must be able to carry your
bike. It must be able to go through a doorway. Down some stairs through
a doorway. A lot to think about.
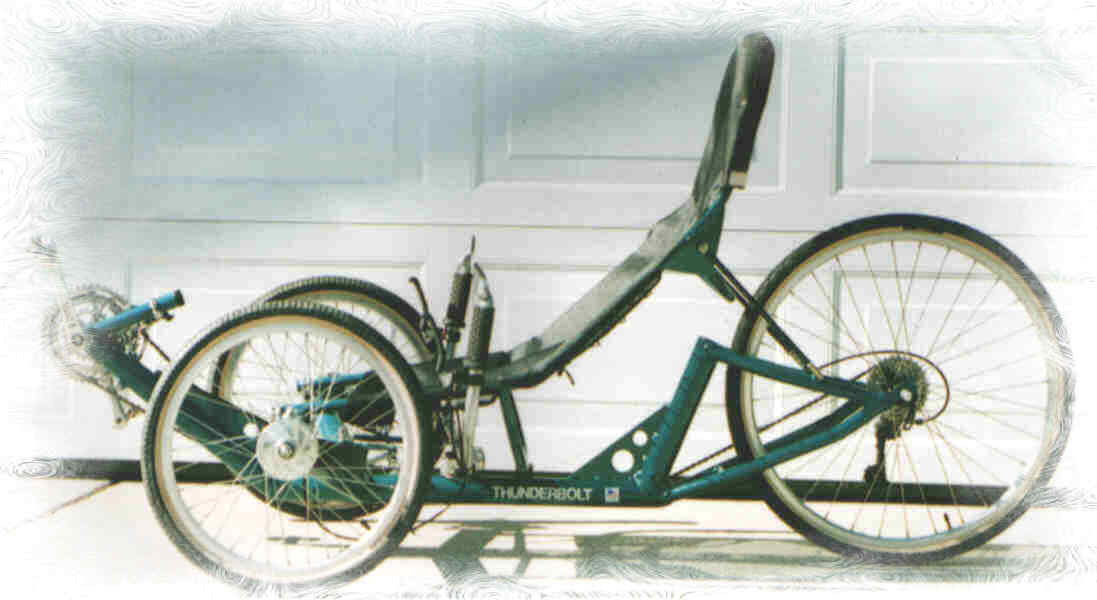
For my own part I found Rickey Horwitz drawings on the internet (Thunderbolt
Sports Recumbent Trike Build
Your Own Recumbent Trike).
A trike which he produced and sold, a couple a years ago. He donated
these drawings to the IHPVA so they always would be available to the public.
His present company does sell drawings (and parts ) of an updated version
of this bike (Thunderbolt MK II Design
Considerations for the Thunderbolt Sports Recumbent Trike) starting
at $44.95.
After checking a lot of other places I talked to a friend of mine about
the possibilities of building this bike. Printed the plans and showed them.
After a lot of talking and consideration I started to build. To show the
drawings to some one not in the middle of it is a wise thing to do. A fresh
view on things and able to se if there are any faults and strange things.
What is needed?
A good mood. Try to keep it.
A lot (Really a lot) of patience.
Space. You might need to leave the building when nothing works, or
when you are waiting for parts.
Understanding cohabit/wife/husband (If you by any chance have one now).
A Big note or a lot of small ones.
A donor-bike, preferable a MTB (not necessarily but it helps). Depending
on the construction and how you are going to use it, you may need two bikes.
A rule you should follow.
Everything you get for your bike should be possible to buy, repair,
and buy spare parts or to trade, in your own country, preferably in your
local "co-op". If not you may have trouble maintaining your bike.
Some parts are really hard to get, if so, then you have to go abroad.
Buy from a well-reputed business so you could get spare parts for what
you are buying.
At the same time it’s probably a lot of things you could use that you
normally don’t relate to as bike parts. Use your imagination.
Parts.
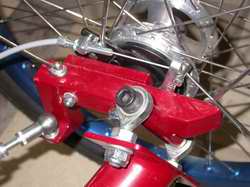
Brakes:
A chapter on its own. If you are going to build a good-looking trike
you need to use stub axles for the front wheels. So ordinary bike brakes
is out. What then? Disc brakes are good-looking and do work well. At least
that’s what they all say. Let’s check. You got to have a hub to place them
on and the bolt that holds them in place must at lest be 12 mm thick. Ordinary
hubs have 8, 9 or 10 mm axels. You got some choices. You could drill that
axle hole to a larger diameter and machine a new seating for the ball bearing.
Or you could buy a hub for 20 mm axle (downhill, heavy-duty MTB). To those
you can buy or do your own axle (look
here, also steering knuckles).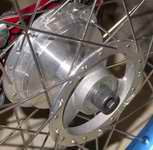
Here in Sweden, drum brakes are difficult to get if not impossible.
Haven’t found any myself. And if you do find them they would probably cost
a fortune. To get away with a lot less trouble you could order them from
a company that sells trikes or parts for them. Ice
in England got Sachs drum brakes for sale to homebuilders (You should also
try Leitra in Denmark; I have heard
that that should be possible too). Ice
still got Sachs drum brakes for a reasonable sum (Parts
pricelist). They have gone over to disc brakes for their trikes and
they sell those hubs to homebuilder too. Cost a bit more than the drum brakes.
There probably are other manufacturers that would be willing to sell
their hubs to homebuilders. Are you well of with money you buy whole wheels
(hubs, brakes, rims, spokes put together). The cost of shipping is quite
larger due to the bulkier package. Me, I bought a pair of Sachs Drum brakes
from Ice.
At the rear wheel a normal rim brake is enough but if you want a disc
brake it is a lot easier than in the front. You should also check in on
your local legislations concerning parking brakes on your three-wheeler.
In Sweden it is legislated to have one (only for Sweden: enligt lag: se
under Cykel och sparkstötting Fordonskungörelsen
(1972:595))
Wheels and their sizes:
In front dim. 406 (20" look at ISO
rim sizes and ETRTO/ISO
to Inch) is probably the wisest choice. There is a wide variety available
of tires (look at Däcksstorlekar406
only in Swedish), from the cheapest to quite expensive. 406
rims is often something you have to order (If you didn’t buy everything
assembled). You could use 355 (18") wheels too. Immediately harder to get
good tires. The choice is yours.
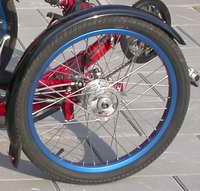 Together
with my Ice
Sachs-hubs, I bought 406 rims from Araya and got them assembled with
ordinary 14 gauge spokes. The tires are some cheap ones from Cykelringen
until I know that everything works.
Together
with my Ice
Sachs-hubs, I bought 406 rims from Araya and got them assembled with
ordinary 14 gauge spokes. The tires are some cheap ones from Cykelringen
until I know that everything works.
At the rear it’s a matter of taste. A 406 wheel at the back, a longer
low frame, lower seat and it becomes a racetrike. The gearing is different
with a 406 wheel at the rear instead of a 559 (26" MTB). What kind
of wheel you choose depends on what kind of donor-bike you choose, and what
you are going to use your trike for. If you have chosen a MTB you got yourself
a 559 in the bargain. I chose one like that for my trike. It is all right
(considering strength) to use standard (14 gauge) spokes for the front wheels
(406 with cross 3) if you want to build them yourself.
When it comes to wheelbuilding you may want to look at Building
Bicycle Wheels by Sheldon Brown
To get the right length to your spokes you can use these excel sheets:
spocalc.xls
Originates from: Spocalc,
by Damon Rinard. A free Excel spoke length calculator.
So you have decided what kind of wheels and what kind of brakes you want to use (drum brakes, disc brakes, rim brakes).
Steering:
The steering is very much a matter of taste. Above seat steering =
ASS or under the seat steering = USS. Take a look at HPVS,
faq (only in Swedish) or Frequently asked questions about recumbent bicycles. Try out the club members bikes on some meeting.
Do ask permission first…
One thing is sure. You have to learn how steering geometry works and
what Ackermann is. Look at all these pages.
What comes after the decision about what kind of steering you want is
the steering knuckles. You know… those things you attach your wheels to.
No easy thing. Some do make it a bit easier for them self by using two
cycle headsets. They still have to lean with certain degrees and therefore
you have to read all that stuff about steering and Ackermann.
It is possible to buy some or all products for the wheel suspension.
Look at the links.
It would be possible to start building here but we will take a
look on what you need more.
Propulsion:
Crank sets, sprockets, chainwheels and pedals do belong to the necessities.
If you got a donor-bike you can use those on that. 
 If not…You can buy the tube for mounting the bottom bracket at some places,
(for example krank/kronrør
at Du ligger
som du har bygget only in Danish, or Telescopic Bottom Bracket). Otherwise you use that on the donor-bike.
Depending on its construction you might want to use two donor-bikes.
If not…You can buy the tube for mounting the bottom bracket at some places,
(for example krank/kronrør
at Du ligger
som du har bygget only in Danish, or Telescopic Bottom Bracket). Otherwise you use that on the donor-bike.
Depending on its construction you might want to use two donor-bikes.
Another thing to consideration is the bottom bracket in relation to
the seat (or vice versa). If the cranks are to high the blood circulation
suffers and you get numbness in the legs (You can get that anyway…), and
the forward view is blocked. On a racer the bottom bracket have to be high
placed because of the air resistance. This is one of the things you got
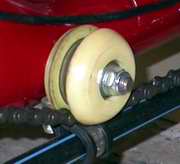
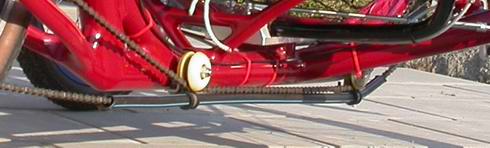
to decide before you start building. Support-wheels. Not some kind of wheels
for you to lean on. On the way from the rear wheel the chain got
to have at least one support-wheel. Different trikes have different
solutions. What you want depends on the construction of your trike. The
Thunderbolt has two chain support-wheels. What I used was one skateboard-wheel and
one in-line skate-wheel.
Both with a groove machined out and the skate board wheel a bit
on the side for a better chainline. There are a lot you can use as chain support-wheels
so use what works for you.
 On
the way to the rear wheel plastic tubing will do. The kind use for
coldwater in houses (preferably bought at the plumber). This tube is delivered
rolled up so to use it you have to straighten it. Use a hot air gun
and a thin rod that you push up the tube. Heat it well and leave the rod be
until the tube has cooled down.
On
the way to the rear wheel plastic tubing will do. The kind use for
coldwater in houses (preferably bought at the plumber). This tube is delivered
rolled up so to use it you have to straighten it. Use a hot air gun
and a thin rod that you push up the tube. Heat it well and leave the rod be
until the tube has cooled down.
Gears:
According to your wallet or use. If you do not want to use your
donor-bike parts there is plenty of choices. Besides the usually 7 - 10 speed
cassettes on the rear hub you can chose an internally geared rear hub,
for example Shimanos
nexus 3, 4 or 7 speed. Sram got the well-known 3*7 and the
DualDrive™
which is 3*8 and 3*9 i.e. 3 internal gears (low, 0 and high) with 7, 8
or 9 sprockets externally. Another product is Rohloff
a hub with, today, 14 internal gears. Sturmey-Archer
is another brand with internal gears, 3, 5 or 7 gears with or without brakes
etc.
In front there are the usually alternatives with either 1, 2 or 3 chainwheels.
Apart from that there are some things called mountaindrive and speeddrive
both from Schlumpf
innovations. They are a bottom bracket with built-in gearing, either
low or over drive that you can shift by clicking your heel on a button.
In addition to all these you can buy, you also can install a middle gear
instead of a chainwheel.
How many gears do you want today?
Seating: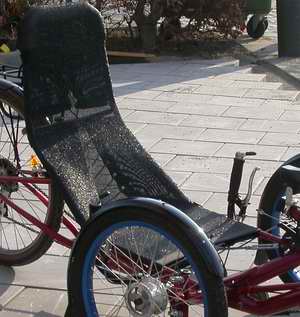
You got two choices when it comes to the seat. Either the seat sling
with a mesh or a "hard seat".
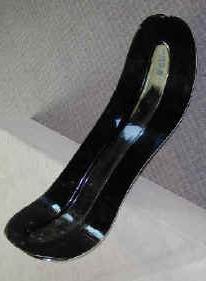
What you choose depends on your bike and your taste. A hard seat can
be made out of plywood, aluminium or fibreglass . With that you should have
some kind of upholstery so it doesn’t get uncomfortable. For that you can
use PORET or FABRICS AND FOAM.
A mesh seat can be made of woven polypropylene cloth. Old seat belts, washing-line
or some kind of strong mesh. If you do use mesh you should use one that
does not stretch.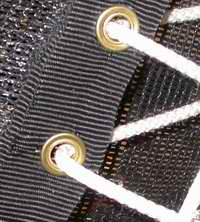 Woven Polypropylene cloth does not do that. (can be bought at ScanCord
AB - Hemsida) only Swedish, or Knitted & Woven Shade Cloth - Gintec Shade Technologies Inc.). The plans I used for building my trike
use that kind of seating material, so that is what I use.
Woven Polypropylene cloth does not do that. (can be bought at ScanCord
AB - Hemsida) only Swedish, or Knitted & Woven Shade Cloth - Gintec Shade Technologies Inc.). The plans I used for building my trike
use that kind of seating material, so that is what I use.
There is a lot of sowing when doing the seat. Nothing too difficult
though. The cloth does need to be melted at the edge so it want fray. A broad
trimming is also needed so you can put some grommets for thightning the
seat in its frame. Putting the grommets in is something you can do yourself.
For a mesh sling seat you also need a frame. Some more welding to do.
Framematerial:
The material. Are you a wiz with the welding-equipment? Choose what
you want. CroMo, Aluminium…
No can do?… Time to find out how good friends you have.
Can weld but not good? Start with ordinary carbon steel. Square tubing
– Round tubing? Square makes it easy to get straight joints etc… Round
tubing looks the best (matter of taste). You should start by building a
jig (kind of template where you put all your parts, before welding them,
to get all the right angles) for the bike. If you choose ordinary carbon
steel you should have some thought to the weight. Just because you think
it is going to weigh to much you shouldn’t under dimension the tubing.
That really doesn’t matter on an ordinary bike. You should be able to lift
your bike. Two kilograms more or less isn’t that important. It’s when you
accelarate that weight matters. For a racetrike the weight does matter.
Carbon steel tubing can be bought at the closest junkyard/surplus store
for the price per kilo. The same dimension as 2" muffler pipe looks good
as frame tubing or maybe 1 ¾". It can also be bought at almost every
mufflershop/autoshop. The price here in Sweden for 2" muffler pipe is about
80 – 150 SEK for 1 – 2 meter in an autoshop. Junkyard price: 5 - 6 meter
about 150 SEK.

Start building:
I am not going to tell every little detail I have done. Instead i
will try to tell about those things I can perhaps give some advice about.
Those things you might not always think on.
Depending on the donor-bike construction you might want to have two
bikes to cut up. Think it through thoroughly what you are going to do before
you do it, measure distances and angles. There is also all the equipment
you are going to put on your bike. You have to make all the holders for
the mudguards, luggage carrier, bottleholders (one or more), lighting,
reflectors, streamer (if you think one is necessary), computer, locks,
breaks both rear and front, wires. Think it through.
My central frame tube is bent up towards the crankset.
To have that done I asked a muffler shop if they could bend my 1 meter
pipe at the middle in a certain angle. No problem. Paid 50 SEK for it.
To join the front pipe with the rear pipe I used a pipe that fitted inside
the 2" tubing.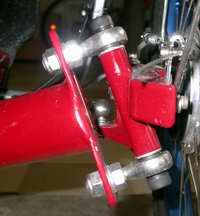 A couple of holes in the thicker pipes for some spotwelding before welding
the joint all around. Be certain the pipes are aligned before welding.
A couple of holes in the thicker pipes for some spotwelding before welding
the joint all around. Be certain the pipes are aligned before welding.
The frame tubing to the front wheels lean. Besides grinding off the tube-ends to fit to the central frame, some kind of jig had to be made. When doing this it is good to have your wheels ready to measure by so it does not get all wrong. A small program that prints out a template that you can tape to your tube and see how much you have to grind away for the tubes to go together nicely is tubemiter (by Giles Puckett). Text file for the program.
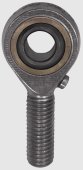 To
be able to tolerate some small errors when welding and to be able to adjust
the camber angle my steering knuckles are attached to rod-end
bearings (only in Swedish) or check out McMaster-Carr.
Getting that angle right can be quite tricky.
Take it easy and use a protractor, set-square and a spirit level.
To
be able to tolerate some small errors when welding and to be able to adjust
the camber angle my steering knuckles are attached to rod-end
bearings (only in Swedish) or check out McMaster-Carr.
Getting that angle right can be quite tricky.
Take it easy and use a protractor, set-square and a spirit level.
You got to have a casterangle too. Depending on what you are going
to use your trike for (racing, touring etc.), you ougth to have a
casterangle adapted for the use of your trike. On my trike it is about
12 degrees. A third angle is the kingpin inclination. Those angles you got to
have right. You got to know your steering geometry.
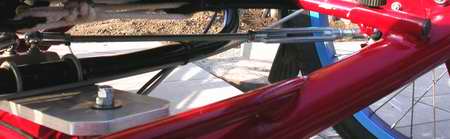
To fasten the bottom bracket you got to have some kind of boom clamp
or likewise. You can do this in several different ways. 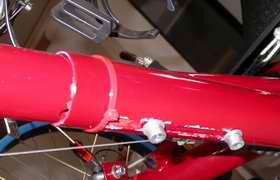 I did it this way. When you cut of the bottom bracket from your donor-bike
leave at least 15 cm above the place where you are going to put your front
derailer. You have to have some place to put your computer, lighting, front
reflex (if legislated, good thing to have one anyway) and a bottle,
I did it this way. When you cut of the bottom bracket from your donor-bike
leave at least 15 cm above the place where you are going to put your front
derailer. You have to have some place to put your computer, lighting, front
reflex (if legislated, good thing to have one anyway) and a bottle, 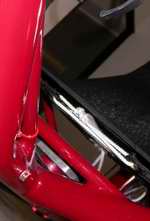 and
if you change your chainwheel to a larger one you need to move your derailer.
What you really aught to have depending on your framedesign and material used
are web gussets or crossmembers for reinforcements to support your front
boom and the bottom bracket. There are great forces working on the front
boom when you are pedalling. You can see the front boom turning slightly
back and forth when you pedal. Really so if you pedal hard.
and
if you change your chainwheel to a larger one you need to move your derailer.
What you really aught to have depending on your framedesign and material used
are web gussets or crossmembers for reinforcements to support your front
boom and the bottom bracket. There are great forces working on the front
boom when you are pedalling. You can see the front boom turning slightly
back and forth when you pedal. Really so if you pedal hard.
The steering knuckles would be best made from aluminium. If you can’t
do it on your own you could buy them. There are a couple of places where
you can buy these things. For ex. at Disc
Brake Steering Knuckles. Couple more amongst the links.
Well I couldn’t and this is the result of my homework.
If you do your own experiments try to get the wheel-axle as close to
the turning centre as possible. Not in front of it, never, but maybe 1
– 2 cm behind it maximum. The closer the better.
I do not want to recommend something special when it comes to the steering.
You just have to figure out what fits your trike if you do not build it
after plans. On my trike there should have been one thing but it turned
out quite different. It works anyway.
What I can tell you is a way to get you a variable (continuous)
adjustment for your trikes toe-in and centring of the handlebars without
being to costly. Depending on the construction of the trike you got 4
or more ball joints. Usually you just find the right-hand threaded ball
joints in the shops. But to be able to get variable adjustment you got
to have one left-hand threaded ball joint and one right-hand threaded ball
joint (for one side). (In Sweden you can order these from Wiberger
AB - Maskindetaljer look at Vinkellänk
DIN71802), only in Swedish), 8 mm diameter will do. To get the variable
adjustment you have to buy turnbuckles (rigging screw) in the same diameter,
there are several styles, use galvanized. You also need a threaded rod.
Take the turnbuckle and remove the right threaded part. On the left threaded
side you cut of just the eye/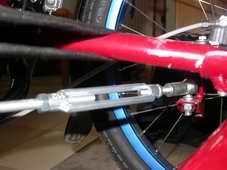 fork.
On that you screw on the left threaded ball joint and tighten it. The left
threaded nut sits against the middle of the turnbuckle. On the right threaded
side of the turnbuckle you put the threaded rod and the right threaded
nut. In the end of the threaded rod you screw on the right threaded ball
joint and tighten it. Of cause you adjust the length of the threaded rod
to fit your trike. Now you can adjust your toe in and centre the handlebars
really accurate. Actually you only need one locknut for example the right
threaded one. If you want to you can dress the threaded rod with shrinking
tubing. It comes in different colours. There are some that have adhesive
inside to prevent corrosion.
fork.
On that you screw on the left threaded ball joint and tighten it. The left
threaded nut sits against the middle of the turnbuckle. On the right threaded
side of the turnbuckle you put the threaded rod and the right threaded
nut. In the end of the threaded rod you screw on the right threaded ball
joint and tighten it. Of cause you adjust the length of the threaded rod
to fit your trike. Now you can adjust your toe in and centre the handlebars
really accurate. Actually you only need one locknut for example the right
threaded one. If you want to you can dress the threaded rod with shrinking
tubing. It comes in different colours. There are some that have adhesive
inside to prevent corrosion.
No matter where you do build your trike you have to do some rustproofing.
Yes, even when you are working on it, during the building. Use a good anti-corrosive
paint. Doesn’t matter if it is sprayed or brushed on. Just check the time
to dry.
When you finished welding in one place, grind the weld. Do not wait
until last to grind the welds. You might not reach every one of them. When
one part is grinded to a finish you fill it with plastic padding. Prime
it. Sandpaper it. Fill it. Sandpaper it. Prime it. This will continue until
you have a real good finish. If you have a look at some new bikes their
welds are not grinded at all. Does not look to good. If you are doing something,
do it good.
For specifications go here: Specification
For more pictures of my trike: Pictures
If these are not enough I recommend these
Links.
And if that still is not enough, why not try Google search
![]()
Author: Göran Nicklasson
![]()
![]()