Random terrain.
The random terrain tool is great, it can be used in many ways. You can randomize the entire hole window, but that can create some problems with greenline. The greenline is what you see when the spot the player is standing at is higher than the edge of the window he is facing.Trees are an easy way of hiding the greenline, but if you want an open view like on a links course trees are not the answer.
I use the randomize tool in smaller portions, the first pic shows how I lay out some terrain shapes. One large only in the middle, so that I still have controll of the edges of the hole window. If necessary, I can raise the outer smaller shapes before applying the randomize tool on them. Try experimenting with different settings to see what you get.
I keep 50% of the outer shapes outside the hole window, so that when raised I know the highest point will be exactly at the edge and not inside the edge. Then I usually smooth the entire hole once or twice or more depending on the settings and how rough a look I want.
What you have now is a nicely rolling piece of terrain, that is guaranteed not to be flat or boring. It is not fixed and finished, you can still alter it. If you have a high ridge in front of the tee area, it is better to place a terrain shape there and sink the area and then smooth with a donut ring around the sunken area. If you just flatten it, you will lose all the randomness in the ground. This way you can of course also enhance already existing ridges and valleys, the possibilities are endless.Or if a part of the terrain near the edge is at dangerously low level, just place a terrain shape over that area and flatten to highest and then randomize that specific shape untill you´re happy with it.
Experiment a lot, and try using different settings in the random tool. If it doesn´t look inspiring, just undo and try it again untill it looks good.
Hiding the greenline.
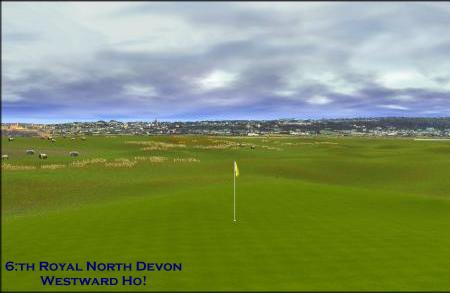
As said before, the greenline appears when the player is standing at a higher level than the ground near the edge of the hole window he is facing.The method I used on Royal North Devon, was to gradually raise the landscape to the hole window edge. It was done almost yard by yard, so that it would still look reasonable flat.
Say I started my part of the design work with a hole made by Jay where the second shot would probably be played from 10 feet above the "sea level". Now let´s say the terrain from behind the green and backwards was at 0 feet. To hide the ugly greenline that is present, I would have to raise the ground behind the green gradually from 0 to +15 feet.
The method I used was to create a terrain shape covering the area behind and to the sides of the green all the way to the edges. Highlight the shape and push the "flatten to highest" button, while holding SHIFT. I would start by setting the elevation to 2 feet, push the terrain shape back 5 yards and set the elevation to 4 feet and keep on untill I was at 15 feet. When finished, place the shape where it was first and smooth once. Then I make some much smaller very irregular shapes and raise and sink and smooth untill it looks natural. Finally if needed, I put a couple of shapes 50% outside the edge and use the hill tool to connect the ground with the background.
The same method was used to the sides of the holes, so that it looked good from every angle behind the green towards the tee. I was working with holes that were already randomised, so I often had to flatten a large area to the same level as the fairway and restart from there.
One important thing to know about the "flatten to lowest/middle/highest" button is to hold SHIFT while clicking it. This will give you more controll because of the option to type in exact level "set to hight" for the terrain shape you are using. If you type in a number in the "adjust +/- " field, it will affect a much wider area.